
Flickr Photoset
View as Slideshow
Plywood to boat!
Flickr Photoset
View as Slideshow
Plywood to boat!
Filed under Assembly, Cutting and shaping, Glassing, Layout, Materials, Painting, Rigging, Sanding and finishing, Tools, Uncategorized
Well, today I steeled up my courage and went at the mast with the Makita 1902 planer I purchased a week or so ago. It went pretty well. In about 2 1/2 hours I was done with the planer. The rest will be sanding, maybe some hand plane to round over the edges and varnishing. I’m really sorry I didn’t get a picture taken of me working on this outside in the driveway. I filled 2 garbage bags with shavings and sawdust. I had a perfect day…warm and calm so the shavings and dust weren’t blowing everywhere. This is not something to do inside….way too messy.

This evening I epoxied one of the rear decks into place before calling it a day. I had expected to be able to do both sides of the back but the first required more clamps than I expected and I ran out of the nice non-marring ones so I will do the other side first thing in the morning.

Filed under Assembly, Cutting and shaping, Tools
The last few days have been spent mostly sanding and sanding and sanding. My only advice to anybody else starting a boat of their own….budget to pay somebody else to sand and paint it for you 😉
But finally, at 2 this afternoon I started the first coat of paint on the hull. I was done at 4:30. Brushed it all on.
I wound up using Benjamin Moore alkyd paint called Metal and Wood Interior/Exterior 133 01 High Gloss enamel. I wound up using white…if I decide to change it I can just paint over it someday. The paint went on very nicely using a 4 inch brush. I just went out and checked and I have no runs … it smoothed out pretty good. You can see brush strokes … but it looks decent overall. There were a couple of places where I sanded through the primer down to the epoxy covered wood and those spots will benefit from having another coat put on tomorrow but otherwise the coverage is great. This paint was a distinct pleasure to use compared to the epoxy primer. It really doesn’t look much different as the primer was white. I took some pictures but they didn’t look very good as I had the doors closed to keep the wind from blowing dust onto the paint.
The last couple of days I have also built bunks to hold the boat for the trailer that is being put together for me next week.
Today I also cut up the 1/4″ x 4″ x 24″ piece of UHMW plastic that I bought to use as a slippery surface between the rudder cheek and rudder. I fitted it to the rudder cheek, trimmed it with the jigsaw and router, drilled holes and countersunk them a bit. I think it looks pretty good…

I wound up the day by epoxy coating the rudder, cheek and leeboard. I may put some fiberglass tape on the leeboard and rudder leading and trailing edges tomorrow….before or after I put the second coat of paint on the hull.
Filed under Assembly, Cutting and shaping, Painting, Sanding and finishing
The last three days have been busy as I finished coating the bottom and sides with two coats of epoxy. Hard to spread with a paintbrush, I finally started using a spreader when I was nearly 3/4 done and that was a lot faster.
Once the epoxy firmed up, I scraped the most egregious runs and blobs…doesn’t matter how hard I try to make it smooth it comes up needing a lot of work….and then started sanding with the random orbital sander.
Finally I am pretty much finished sanding the outside of the hull. All I have left right now is the underside of the gunwales and the stem which I am going to do so that I won’t mark the paint by sanding them after I paint the hull.
I also remembered to cut the holes in the anchor well and rear slop well. I used a small drill to locate the holes by drilling from inside. Then, I used a 1″ Forstner bit to cut the holes. The bits that I bought from Lee Valley did a great job. No tear-out at all, just nice sharp edges.


After drilling the holes I taped some wax paper on the inside of the boat (The boat is upside down) and then painted some unthickened epoxy onto the plywood edges of the holes. Then I added wood flour and cabosil to the remaining epoxy and poured that into the holes. The epoxy in the anchor well set up very quickly as it was sitting in the sun and the sun was very warm this afternoon. The other epoxy took quite a bit longer. Before they fully set up I used the 1″ bit to put a small hole in the centre of the hole by placing it on top of the hole and making sure that the edges all lined up with the hole edges.
By evening, they were both ready to be drilled out. I used a 3/4″ Forstner bit to drill out the center of the epoxy plugs, leaving a 1/8′ layer of epoxy attached to the plywood…nice and waterproof. The Forstner bit cut the epoxy very nicely and I have two holes that need no further attention with sandpaper.
On Thursday after work I went to Broadway Millwork to see about getting them to cut the tapers on my mast. The owner, Doug, a super nice guy, was most generous with his time talking about what had to be done and how he could accomplish it with the equipment he has in his shop. It doesn’t look like he will be able to do it But I came away with several ideas about jig building that I may be able to use with my router if need be. He also gave me the name of another fellow to call who may be able to help me out. The beat goes on…..
Filed under Cutting and shaping, Sanding and finishing, Tools
Tonight I finished the tiller. I clamped it to a sawhorse and used the jigsaw to cut most of the material away where the rudder cheek fits. Then, I used the router freehand and it turned out pretty good. A bit of cleanup with a rasp and it was good enough.
After that, I cleaned off the hull with an alcohol soaked rag and paper towels prior to putting on a final coat of epoxy before I put on the epoxy primer. I thought I might get the whole boat done but I quit after doing half. The epoxy was very viscous due to the cool temperature and it was a ton of work spreading it out with a paintbrush. I even got a blister on the ring finger on my right hand. I’ll put a final coat on the other half early tomorrow morning before I go to work or when I come home after work. It is supposed to be warmer so if I leave it until later it should go pretty easily.
I still haven’t figured out how I am going to cut the tapers on the mast. That is the only major fabrication job that is left. The mast, epoxying the mast step to the floor in the cockpit and pouring lead into the rudder…that’s it! The rest is sanding, fairing and painting before attaching all the rigging pieces.
Filed under Cutting and shaping, Sanding and finishing
Today I took my mast to a local furniture shop to have the tapers cut but when I got there and told the owner what I wanted he didn’t want to do it. So, I had him joint it and get it square. It’s much lighter and it’s nice to have gotten rid of the marks from the clamps and the epoxy squeezeout but I still have a big obstacle in my way.
Today I took the tiller blank and the mast step over to Terry’s to get him to cut off the U-bolt in the step and drill the holes in the tiller for the bolts to go through to attach to the rudder cheek and the other one that is there to help prevent the rudder from splitting.
Came home and cut the tapers on the tiller with the jigsaw and then used the router to trim right to the line. Did some cleanup and shaping with the small hand plane…that thing is so handy I can’t believe it.
Still haven’t decided on the paint. Was looking at the System Three Yacht Primer and LPU paint…both of which are water based. The paint doesn’t even need a respirator…something quite incredible for Linked Polyurethane which usually has isocyanates and requires serious fresh air respirator/breathing apparatus. But baby is it expensive…$150/gallon for paint and $105/gallon for primer. I may just put another coat of epoxy on everything as I have enough to do that, put a coat of the two part epoxy primer I got from General paint on everything and then finish it off with General Paint marine enamel at $60/gallon. I sure like the System Three stuff and not even needing to wear a respirator according to their tech support people but for the cost I think the other stuff will last pretty well.
I’ll think about it overnight.
Filed under Assembly, Cutting and shaping, Materials
Since last weekend I have sanded the entire hull so that it looks fairly good to my untrained eye. I am agonizing over how to paint it, what to paint it with, etc, etc. The choices are endless it seems. The different points of view vastly different. It is hard to figure out what to do. I have been reading Sam Devlin’s excellent book, Devlin’s Boat Building, and he follows about a 15 step process on his boats…but his boats are likely to be in the water far longer than my boat ever will, he is a commercial builder and his clients expect a professional finish…and I am an amateur whose boat will not be in the water for more than a few days at a time…if that. I am building this boat for my boys to enjoy and have fun in…and that won’t involve worrying too much about running into rocks. As my friend Terry Dopson said yesterday when I explained my predicament to him….”It’s not a Ferrari.” But, I still would like to do a job that looks at least half decent. So, I vacillate back and forth on what to do. I search on the internet for information….and winter draws ever closer.
Today I did a couple of small things just to get them out of the way while I stew about painting. I mounted the piece to hold the lower gudgeon for the rudder cheek, routed out a hole in the rudder for the lead sinkweight, cut out the rudder cheek where the tiller will rest, rounded off the cheek to follow the radius of the tiller’s movement up and down and mounted a u-bolt in the mast step for the downhaul on the yard. I’ll need to pay Terry a visit to cut down the U-bolt but I think what I have decided to do will work quite well. I’ve been reading David Nichols’ book called “The Working Guide to Traditional Small-Boat Sails”, trying to educate myself as to how to set up the rigging for the balance lug sail I am using. It’s a good thing I did as setting up the U-bolt the way I did will make it very strong…better than using a cleat screwed into the mast step with a couple of screws.


I really like the rudder work as I set the router to leave about 1/8″ of plywood…the plan being that this way I don’t have to clamp metal on the bottom to keep the lead in when I pour the molten stuff in to make the sinkweight. The screws are there to keep the lead from falling out.
Maybe tomorrow I will have decided how to proceed with my paint job.
Filed under Assembly, Cutting and shaping, Glassing, Sanding and finishing
While on vacation on Vancouver Island we stayed a couple of days with friends, Bob and Liisa, in Ladysmith. On our last day I went to Coastal Pacific Forest Products and bought two 17 foot long 2 x 3 1/2 Douglas Fir boards for the mast. After supper Bob and I used his thickness planer to reduce them in size and better see what I had purchased as they were rough cut. It was very nice to see lumber with only one knot in it. We cut them down to 14 feet long and wrapped them in plastic to protect them from the rain on the trip home. We drove through some downpours the next day but our wrap job was perfect as I unwrapped them at Vernon BC where Patty and the boys are staying for another 10 days while I fly home to Saskatoon to work.
After I get caught up at work I’ll get busy on the boat. It’s Sunday and I got in about noon and have been at work since late afternoon.
Filed under Cutting and shaping, Materials
The last couple of days I have gotten a fair bit done. I am undecided on whether or not to use the epoxy primer I have or to go with an alkyd or latex primer. I had been planning on starting to prime the inside of the bulkheads Saturday morning but decided to do other things instead while I thought about what type of paint to use.
I have gone over the edges of the deck covers with the 1/4″ round over bit and in the places I can’t reach with the router I have used my trusty handplane and a sanding block. It looks much better with the square edges knocked off.
Saturday morning I grabbed a 2×4 I have had laying around and tried fitting it to the transom. The transom plywood has developed a bit of an inward curve. The 2×4 was also curved so I tried clamping it with the curve outwards and pulling the transom to it. I think it would have left too large a gap that may have been difficult to fill and turned the other way the curves matched nicely and it was an easy clamp job. I cut it approximately to length.
Then, I decided to lower the transom by 3″ so that it has a finished height of about 15″. I marked this out and then used the jigsaw to cut it fairly close. After it was close I clamped a piece of wood to the inside of the transom on the final cut line and used the router with the edge trimming bit to cut to the edge. A bit more work with a wood rasp and the sanding block and things were looking good.
Then, I decided to drill holes for the 3/8″ bolts suggested by Jim Michalak to bolt the transom support posts (Made of 2x4s) to the 2×4 motor board. I had previously picked up 3 1/2″ long bolts which were too short. After drilling the holes I decided to drill some recesses so that the bolts would be usable. Because I had drilled 3/8″ holes I figured that the Forstner bits would be difficult to center and decided to use the large router bit I have that is 1 1/8″ across. Well, it did the job but it ain’t too pretty! I may just fill those holes right in with filleting material before I am done.
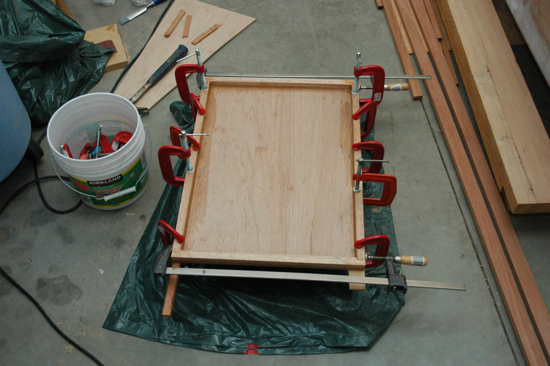
That being done I cut the small pieces of wood that go around the outside edge of the wood. I debated doing an inlay but eventually opted for the easier route of cutting the hatch covers and then fitting the wood to the edges with rabbeted joints.
Hunter helped me by turning the saw off and on and actually cut a couple of pieces to length on the table saw with me watching him like a hawk. He was pretty scared and asked to just man the switch. I am glad he has respect for the danger of this machine but it was good for him to give it a try.
By the time the evening ended I had one hatch cover glued and clamped. The other one will have to wait for late tomorrow or Monday as we are going to Iroquois Lake tomorrow to hopefully do a little kayaking and to mow the grass on our lot.
Photos:


Lastly, just the plywood for the front hatch cover laying in place…

Filed under Assembly, Cutting and shaping, Tools

The last couple of days have been busy. I have worked part days and come home to work on the boat.
Wednesday I built the hatch supports…cut them out, fitted them and epoxied them into place. After I had everything covered in goop and several pieces attached I remembered that I had wanted to lay the plywood on the decking without the inside hatch attached yet so that I could trace the opening in the plywood and cut the deck cover out in one piece. The importance of thinking ahead!
I managed to get everything in place while walking around the garage with a piece of wax paper that I had been using to collect squeezeout stuck to my running shoe. Not a pretty sight I wasn’t.
Here are the deck supports, etc…

Today, Thursday, I found a place in town with some stainless fittings and other useful stuff. I bought an anchor, chain and rope and a u-bolt from them. The u-bolt turned out to be too small for what I had planned to use it for but I’ll find something else for it I am sure.
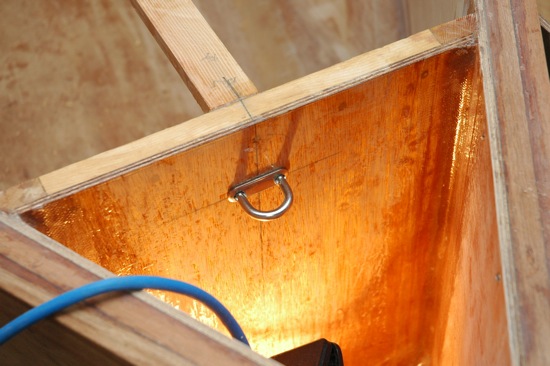
A couple of weeks ago, my young friend Dylan Walker, from Australia, who has already, at the age of 17 I believe, forgotten more about sailing than I will ever know, suggested that I mount a good stout u-bolt in the anchor well to attach the anchor to. Dylan gave me an education on why, and I decided to use a u-bolt I had on hand that I purchased from Duckworks BBS a while ago for this purpose.
I decided to reinforce the bulkhead so I cut a piece of 3/4 inch by 3 inch fir to fit between the existing bulkhead supports and then cut another piece to go over that and be screwed to the bulkhead, sandwiching the first piece between the plywood of bulkhead 1 and the longer piece of fir. All liberally covered with epoxy…the boat will be pulled to the bottom before that will fail. Here is a photo of the back with the U-bolt mounted.

While the epoxy was setting up, I conscripted Hunter and got him to lay in the bulkhead while I laid the 1/4 inch ply on top of it. He then traced around the outside of the hatch opening. I then cut out the opening and spent quite a bit of time with the jigsaw, handplane and sanding block getting the opening large enough to fit over the hatch. When that was done I decided to use the router and the edge trimming bit to cut the outside edges to shape. I popped up the plywood and slid it over to one side. I used a block of wood the same width as each layer of gunwale to kepp the spacing even and placed this block between the hatch and the opening in the plywood. I then clamped down the plywood and used the anchor to keep it from moving while I routed the edges.


A bit more time with the router and I had things looking pretty good.

Then it was time to drill the holes for the U-bolt. This was a bit difficult as I didn’t have much room under the supports previously installed…would have been a bit better if I had thought ahead and done this first!
A couple shot with the deck covers…the back ones have yet to be trimmed to fit but that will be an easy job. You can also see the piece of scrap painted green. I’m not so sure I like it today. Hunter asked me about painting it red so I am considering that. What colour to paint the interior is another question….


Tomorrow I will sand the inside of the bulkheads as much as possible and then on Saturday or Sunday I plan to paint the inside of the bulkheads with primer….BIG STEP!!
Filed under Assembly, Cutting and shaping, Layout, Tools


You must be logged in to post a comment.